Posts tagged food
real simple

ok friends, sorry I have been absent for so long. We have been busy busy busy and along with that, cooking MANY dinners from so many great recipes I have been storing up to blog about.We have been watching a lot of Hulu and making trips to the library in our little free time. More specifically, we have been watching a lot of "food tv". Kitchen Nightmares, Jamie Olivers Food Revolution, I'm reading a slurry of cookbooks from the library, and just recently convinced Andrew to let me purchase my "must have book of 2010."I am reading this new book, "The Art of Eating In"...not sure if it's new to the world, but it's new to me. Oh my lord, Cathy Erway: you are my kindred spirit. I chuckle, I gasp, I nod along as I read your book. I feel like we are friends, having a conversation about your new venture. But every page I pass, I am affirmed in my convictions that while eating out is a treat in so many ways...cooking brings me so much more joy than having someone serve me. My mind has been afire with thoughts of where my food comes from, who made it, whats in it, how does it get to be what it is...and they weave there way in and out and inbetween my daily doings as I think and prepare for that evenings meal. My hands are quickly chopping the onions. I'm cooking the meat with the precise amounts of spices, salt, butter, fat...so I know what is going in to the food and on to my plate. I feel inspired by Cathy...so be prepared to hear my rambles of questions & thoughts as I dig more into her book and blog.That's how I got at this recipe. The ingredients aren't special, I didn't buy them at a food emporium or a specialty shop. This recipe just simply holds memories for me. The taste brings me back to the times I've prepared it...usually for my husband. Times we've shared it with others come back to my mind, and it reminds me that good food doesn't need to be made of a million little specialty ingredients, machines, techniques. Well...not all of the time.Andrew requested this dish the other day when I asked him what he'd like for dinner. After picking up my new Le Cruseut french oven (!!) (another great craigslist find), we headed to the store to pick up what was needed. I think the one thing I love about this beef stroganoff compared to others, is that the vegetables stay kind of crunchy after cooking them, so it's almost refreshing.Also, this dish can be doubled easily for entertaining, and doesn't need much "tending to" so you can cook it easily and serve quickly!

Beef Stroganoff by Real Simple's Kate Merker, December 2006Serves 4

Ingredients

  • 1 12-ounce package egg noodles
  • 1 tablespoon olive oil
  • 1 small yellow onion, thinly sliced
  • 1/2 teaspoon kosher salt
  • 1 4- to 4.5-ounce can or jar sliced mushrooms, drained **if you substitute fresh, it will have more crunch and texture.
  • 1 green bell pepper, thinly sliced (optional) **do not make this optional..it makes the dish so unique and tasty!
  • 2 10-ounce packages fully cooked beef strips **if you are in a pinch..sure-go for this...I bought beef and cooked it in 1 tbs butter and it is much less chewy than this packaged beef. Plus...you made it!
  • 1 8-ounce container light sour cream
  • 2 1/2 tablespoons steak sauce
  1. If using raw meat, slice thinly (or purchase "stroganoff beef") and slice into thin strips. Melt 1 tbs butter in a pan, and cook meet accordingly...about 2 minutes per side depending on the thickness of the cut (mine were pretty thin, so it didn't take much time).
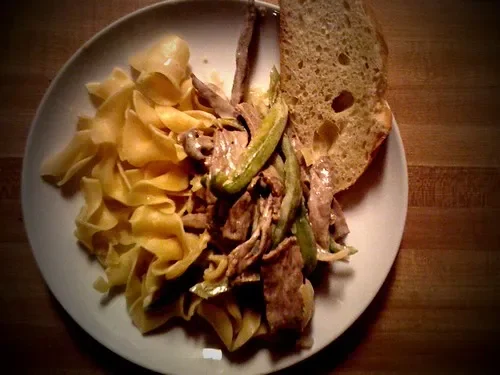
  2. Cook the noodles according to the package directions. Meanwhile, in a large saucepan, over medium heat, heat the oil. Add the onion and salt and cook for 5 minutes. Add the mushrooms and bell pepper (if using) and cook for 5 minutes. Add the beef and cook until warmed through, about 8 minutes.
  3. In a small bowl, combine the sour cream and steak sauce and stir the mixture into the beef and mushrooms. Divide the drained noodles among individual plates and top with the stroganoff

my favorite treat from the market...Mexican Cola...yummmm.
bippity boppity bacon

So after a long weekend of tramping around town with mom+little sis, 1 chicago style hotdog, a trip to Rosebud (where I got the inspiration for this recipe), the Art Institute and many delicious breakfasts later: I'm back, Wustof in hand, Canon Rebel back in biz to document my fun. I do have to admit though, I love the iPhone pictures, but we'll see how this goes.As I said before, my mom and sister where in town this past weekend for their spring break. On Saturday night, we went from restaurant to restaurant, trying to get a quick table for dinner sans reservations. Finally after walking in circles around River North, we ended up at the doorstep of Rosebud. After shopping and going to museums all afternoon, we were ready for a meal: and boy did we get a treat! I ordered the Fettuccine Boscaiola, which is Mushrooms, Spinach, Garlic in a White Sauce with Toasted Breadcrumbs and White Truffle Oil.  Each bite was divine.  The mushrooms where cooked perfectly to my taste (I like a little bit of cooked crunch...nothing limp when it comes to mushrooms, that's boring!), and the breadcrumbs where a perfect surprise on top. We also had a traditional Spaghetti, and topped our meal off with a giant slice of the Canolli cake. We waddled our way back to the hotel room, and promised that this would be our new dinner place in town.So since I was so inspired, I can't seem to get away from Martha lately, I had to try this. Plus my favorite part is I had all these things in my pantry which makes it all the better. This dish is a carbonara like pasta, quick, easy, ready in 25 minutes.  I opted for turkey bacon instead of pancetta: although next time I may use a high quality bacon. Turkey bacon doesn't give you those delicious crumblies...it was more like bacon chips. I also used about a 1/2 tbs of black truffle oil to give it a little bit of a flourishing aroma and taste.

Fresh Linguine Pasta with Bacon and Peas by Martha Stewart

Ingredients

Serves 4 to 6

  • Coarse salt and ground pepper
  • 4 slices turkey bacon, sliced crosswise into 1/2-inch pieces
  • 2 shallots, halved and thinly sliced OR 1 medium onion+2cloves minced garlic
  • 1 box (10 ounces) frozen peas, thawed
  • 1/3 cup heavy whipping cream or half and half
  • 2/3 cup chicken broth
  • 18 ounces fresh linguine pasta or any type of fresh cut pasta

Directions

  1. Set a large pot of salted water to boil. In a large skillet, cook bacon over medium until crisp, 5 to 7 minutes. With a slotted spoon, transfer to a paper-towel-lined plate to drain (leave fat in skillet).
  2. Add shallots/onions+garlic to skillet; season with salt and pepper. Cook over medium, stirring occasionally, until they begin to soften, 1 to 2 minutes.
  3. Reserve 2/3 cup of pasta water to make chicken broth (if using a boullion cube**).
  4. Add peas, chicken broth and whipping cream; season with salt and pepper. Simmer until slightly thickened, about 2 minutes.
  5. While simmering, drizzle oil over mixture. Toss while continuing to simmer.
  6. Cook pasta in boiling water until al dente, according to package instructions. Reserve 2/3 cup pasta water**; drain pasta, and return to pot. Pour sauce over pasta; toss to combine. Sprinkle with bacon, and serve

**I used a bullion cube instead of canned/boxed chicken broth because that's what I had in my cupboard. I made the broth using the water from the pasta so it was more starchy and able to thicken a little better with the peas and onions.  If you don't use a bouillon cube, just reserve 1/4 cup of the pasta water and slowly add while tossing with sauce.

lemony goodness

Since we got a KitchenAid for Christmas this year (Thanks Auntie Teri!!) I have been way more motivated to bake. The work is already done for me when whipping egg whites, making frosting, and especially when making the angel food cake batter and frosting for this recipe.I get the Martha Stewart Everyday Food emails well...everyday. And yesterday as I was cruising the website I noticed Martha had a whole feature on lemons.I came across an angel food cake recipe that looked so beautiful and delicious in the picture. I love angel food cake: it's light, fluffy, melts in your mouth. Tasty. Of course I've only ever made the boxed ones, so here was my hand at trying to make my first angel food cake.Now, let me tell you about my angel food adventure. Martha says..." Transfer batter to a 10-inch angel food cake pan with legs."Translation in my mind: Isn't a tube pan a less fancy bundt pan?So I begin my adventure after work to find a cheap tube pan. Surely any thrift store in the Chicagoland area with a pretty wide variety of kitchenware should have at least ONE.I went to 3 different thrift stores. Of course everyone has a plethora of bundt pans to donate to the Salvation Army...probably because they once tried to make an angelfood cake that stuck to it and thought "What is the point of owning this."After 90 minutes of driving to my favorite thrift stores: nada. I finally drag myself to Target before Andrew needs the car to go to a meeting: they have ONE tube pan. PRAISE the Lord.Whats the point of jabbering on about bundt pans vs. tube variety?The cake will simply not come out of your fancy schmanzy bundt pan.Oh, and the cake was a tasty snack today at work!Also in other news, my new memory card came! My C. Rebel is back in business!Onward to the recipe!

Lemony Angel Food Cake recipe by Martha Stewart

Ingredients

Makes one 10-inch cake; Serves 10 to 12for the cake

  • 1 cup sifted cake flour (not self-rising)
  • 1 1/2 cups sugar
  • 12 large egg whites
  • 2 tablespoons finely grated lemon zest
  • 1 tablespoon plus 1 teaspoon fresh lemon juice
  • 1 teaspoon cream of tartar
  • 1 teaspoon pure vanilla extract
  • 1/4 teaspoon salt

for the lemon cream 'frosting'

  • 1/2 cup fresh lemon juice (if you don't want it really lemony, you could use refrigerated lemons since their taste isn't as forceful as freshly squeezed..but don't you want fresh!?)
  • 1/2 cup sugar
  • 1 tablespoon cake flour (not self-rising)
  • 1/4 teaspoon salt
  • 1 1/2 cups heavy cream, chilled
  • 1 tablespoon finely grated lemon zest

Directions

  1. Make the cake: Preheat oven to 325 degrees, with rack in lower third of oven. Sift flour and 1/2 cup sugar into a bowl.
  2. Whisk whites with a mixer on medium speed until frothy, about 1 minute. Add lemon zest and juice, cream of tartar, vanilla, and salt; continue whisking until soft peaks form, about 2 1/2 minutes. With mixer running, gradually add remaining cup sugar.
  3. Increase speed to medium-high; continue whisking until firm, not stiff, peaks form, about 2 minutes. Sprinkle whites with 1/3 of the flour-sugar mixture. Using a rubber spatula, gently fold to combine. Sprinkle remaining flour-sugar mixture over whites in 2 additions; gently fold to combine.
  4. Transfer batter to a 10-inch angel food cake pan with legs. Gently run a knife through the center of the batter to remove any air bubbles. Bake until a tester inserted into center comes out clean, 45 to 50 minutes.
  5. Remove pan from oven, and invert onto its cooling legs (if your tube pan doesn't have legs, invert it over the neck of a wine, or similarly shaped, bottle to cool)**; let cool, 1 1/2 to 2 hours. Run a knife around the inner and outer edges of cake to remove. Invert onto a serving platter. (Use a knife to separate cake from bottom of pan.) Let cool on a wire rack. Unfrosted cake can be stored in an airtight container for up to 2 days.
  6. Make the lemon cream: Prepare an ice-water bath. Whisk lemon juice, sugar, flour, and salt in a small saucepan over medium-high heat. Bring to a boil; whisk constantly for 1 minute, until it thickens. Transfer to a heatproof bowl set in ice-water bath to cool completely, stirring occasionally. Meanwhile, whisk cream and lemon zest with a mixer on medium speed until medium peaks form, about 3 minutes. Gently fold whipped cream into juice mixture in thirds. Refrigerate lemon cream, up to overnight.

**Turning the cake upside-down on a bottle of wine, or on it's legs is important: don't skip this. If the pan is resting right-side-up, gravity will do it's work and collapse the cake on top of itself.Don't worry: like I said before, the cake will not fall out of the pan if you have done everything right. Gravity will work in the right direction to keep the cake tall when resting on the bottle...just pop the middle hole through the bottleneck.

millions of peaches, peaches for me

I have a new fruit obsession: peaches! I use to despise them: my sister was always eating them growing up. The dripping, the stickiness, the smell, the weird fuzz on the outside. Why would I want that when I could have a fruit I already knew was delicious and safe? And less drippy.Last week I was at my new favorite market, City Fresh. The first thing that caught my eye was the mound of beautiful, plump, peaches. I had to try a few. I bought 2 thinking I could pawn them off at work if I didn't like them. Then it happened, I bit into the crispy, not so juicy and fuzzy fruit I always hated.I was hooked.This past Sunday as I did my shopping, I bought 3# at 49c. It was too good to be true for my new addiction! As I was reading through Bon Appetit this week, I realized the wonderful new cooking opportunities this opened! Fortunately, the August issue has a whole section of peach recipes, and one that caught my eye: Roasted Peaches with Amaretti Crumble. My husband is allergic to coconut, so macaroons are out. I tweaked it to be an almond crumble, and it was a hit with my neighbors who came over for dessert!. Well, here's to my first posting! Bon Appetit!

Roasted Peaches with Almond Crumble

Recipe by Cindy MushetTaken from Bon Appetit magazine, August 2009

Ingredients

  • 5 amaretti cookies (Italian macaroons; about 3/4 ounce total) (I used double the almonds)
  • 3 tablespoons whole natural almonds
  • 2 tablespoons unbleached all purpose flour
  • 1 1/2 tablespoons sugar
  • 3 tablespoons chilled unsalted butter, cut into 1/2-inch cubes
  • 3 firm but ripe large peaches, rinsed, wiped clean of fuzz, halved, pitted
  • Vanilla ice cream

Preparation

  • Preheat oven to 350°F. Butter 11x7x2-inch glass baking dish. Combine cookies, almonds, flour, and sugar in processor. Using on/off turns, process until cookies and almonds are coarsely chopped. Add 3 tablespoons chilled butter to processor. Using on/off turns, process topping mixture until moist clumps form.
  • Place peach halves, cut side up, in prepared dish. Spread topping over surface of each peach half (about 1 generous tablespoon for each), pressing lightly to adhere and leaving 1/4-inch plain border.
  • Bake peaches until tender when pierced with knife and topping is golden brown, about 35 minutes. Cool slightly. Transfer 1 warm roasted peach half to each of 6 plates. Serve with scoop of vanilla ice cream alongside.